


How to Re-purpose a Food Container as a Mini Greenhouse
Sponsored content from Holly Homer from the Kids Activities Blog
While we are all still trying to avoid leaving the house as much as possible, I am still having to buy groceries. During my last grocery run I picked up Rockit apples for the kids to enjoy as snacks between meals. I don’t know about you, but having the kids home all day every day means they are eating everything in sight.

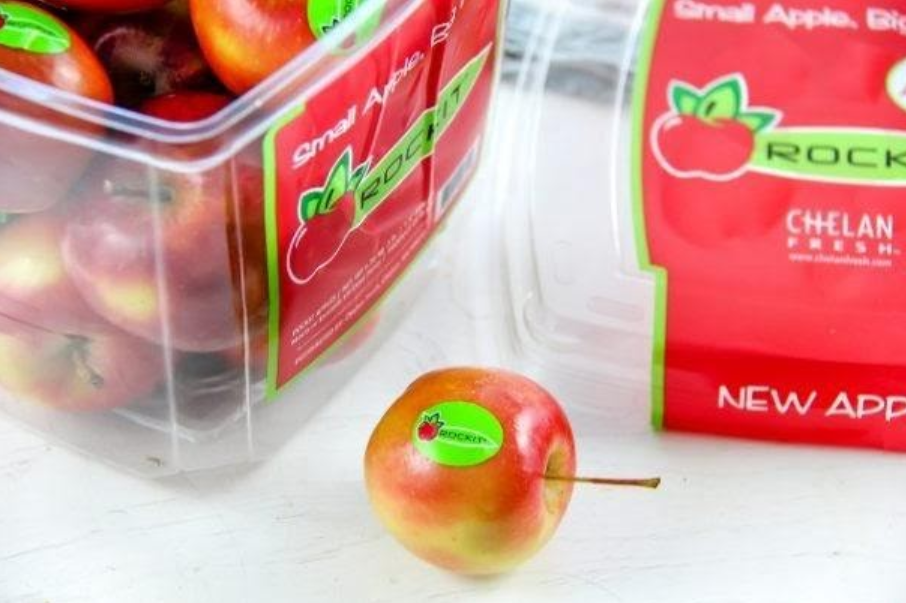
The new Rockit™ apple is known as the world’s first miniature apple. They might be pocket-sized, but they are crisp and sweet and are a great source of Vitamin C and fiber. They are also lower in calories, with only 60 calories per apple.

My son loves them. There were a few years when he couldn’t eat apples due to digestive issues and we recently discovered it was just certain apples that were causing problems for him. He’s so happy now that he can eat these Rockit™ apples every day for a snack and have no issues at all.
Visit Chelan Fresh and use their fruit locator to find Rockit™ apples near you.
What I love about the Rockit™ apple packaging is that they aren’t putting new plastic into the supply chain. Their packaging is made from 100% RPET (recycled polyethylene terephthalate). If you want to give it yet another use then I’m sharing a great idea with you that’s perfect not only for spring gardening but also to celebrate Earth Day on April 22nd.
Let’s keep the “upcycling” chain going forward by turning this plastic container into a miniature seed-starter greenhouse.

It’s so easy to do, and spring is the perfect time to start growing produce at home. We planted arugula in ours and within 3 days we spotted our first tiny sprouts, and then by day 6, they were over an inch tall.
How to Make a Plastic Container Greenhouse
The first thing you want to do is add some ventilation to your container. The lid does have some holes around the edge, but we need to make more. We need drainage holes in the bottom for excess water to drain out, and we need holes in the top for watering and allowing air to circulate.
I used a drill to make this happen. Turn the container upside-down, place the lid on top and very carefully use a drill to make holes through both pieces at the same time. Make sure to hold one side firmly to prevent the container from buckling, and drill slowly.

How to cover drainage holes in planters
Wondering what to put inside your container to keep the soil from running out of the holes with the water? Here are some everyday items you can use:
- Egg cartons
- Coffee filters
- Cheesecloth
- Dryer sheets
- Paper towels
- Packing peanuts
Add about 2.5 to 3 inches of soil to your container, this will allow plenty of room for your sprouts to grow.
Note: We used a seed-starter soil, which is perfect for a mini greenhouse.
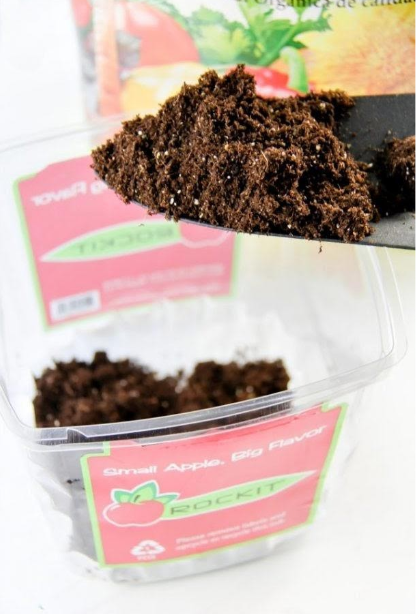
Remove all labels from the container to let more natural sunlight in.
Plant your seeds according to the seed packet instructions. Make a note of when you should expect your first sprouts to appear. Arugula grows pretty quickly with our first sprouts appearing in 3 days, so this would be perfect for kids who might be a little more impatient and want to see results quickly. Within 6 days our sprouts were over an inch tall.

Arugula sprouting in soil 3 days after planting

Arugula sprouting in soil 6 days after planting
Here’s a tip: Use cardboard dividers to separate sections to make for easier transferring into a garden bed, or alternatively, wood sticks to mark where the seed is planted.
Don’t place your greenhouse in direct sunlight and keep the soil moist. The holes underneath will help with draining excess water and the holes on top will allow for easy watering without having to remove the top of the container. Plus, the air will be able to circulate inside the container so the plants can breathe once they start sprouting.
Once the sprouts reach the top of the greenhouse it’s time to transplant them.